Tuesday, October 29, 2013

SUPERDUPERHALLOWEENCRAFTPROJECTNESS!

     So as all of you know (or I thought by now you might have heard), I have been crafting my butt off these past few weeks. It all began with my desire to create a costume for my sister-in-law's 5 month old son. Since his mommy is a Tolkien nerd, I asked if she'd be interested in a baby hobbit costume, and she said yes! So I got to work, and I only had to purchase the green fabric for the cloak since I had pieces of this and that around my apartment. - SCORE -


 So, without much ado, here is my baby hobbit costume, modeled by the gorgeous baby boy belonging to Kim Neyer of Kimberly Neyer Photography! You guys know I can't say enough great things about her, and you can see why in these pics. She's just got a way with capturing the moment, doesn't she? Hit her up for any sort of pictures you can think of -- the only thing she does not do is weddings. Check out her website and blog kimberlyneyer.com . You won't be sorry!!!

ha - gotcha. This is a pic I took on my phone to show the detail I painted onto a onesie for under the outfit.

Here it is :)

OH MY GOODNESS. I just melt when I see these! This little guy made a perfect model for my costume. Now I can't wait to hear from my sister-in-law in Minnesota to see if she got it in the mail this week.


AND THEN I HAD TO MAKE THINGS TO REPAY KIM FOR HER AWESOME JOB TAKING PICTURES FOR MY BLOG!!! 


Her two boys are being a pirate and a parrot for Halloween this year, so I offered to make footwear for their costumes since she already had the costumes themselves. Here's what I wound up with.


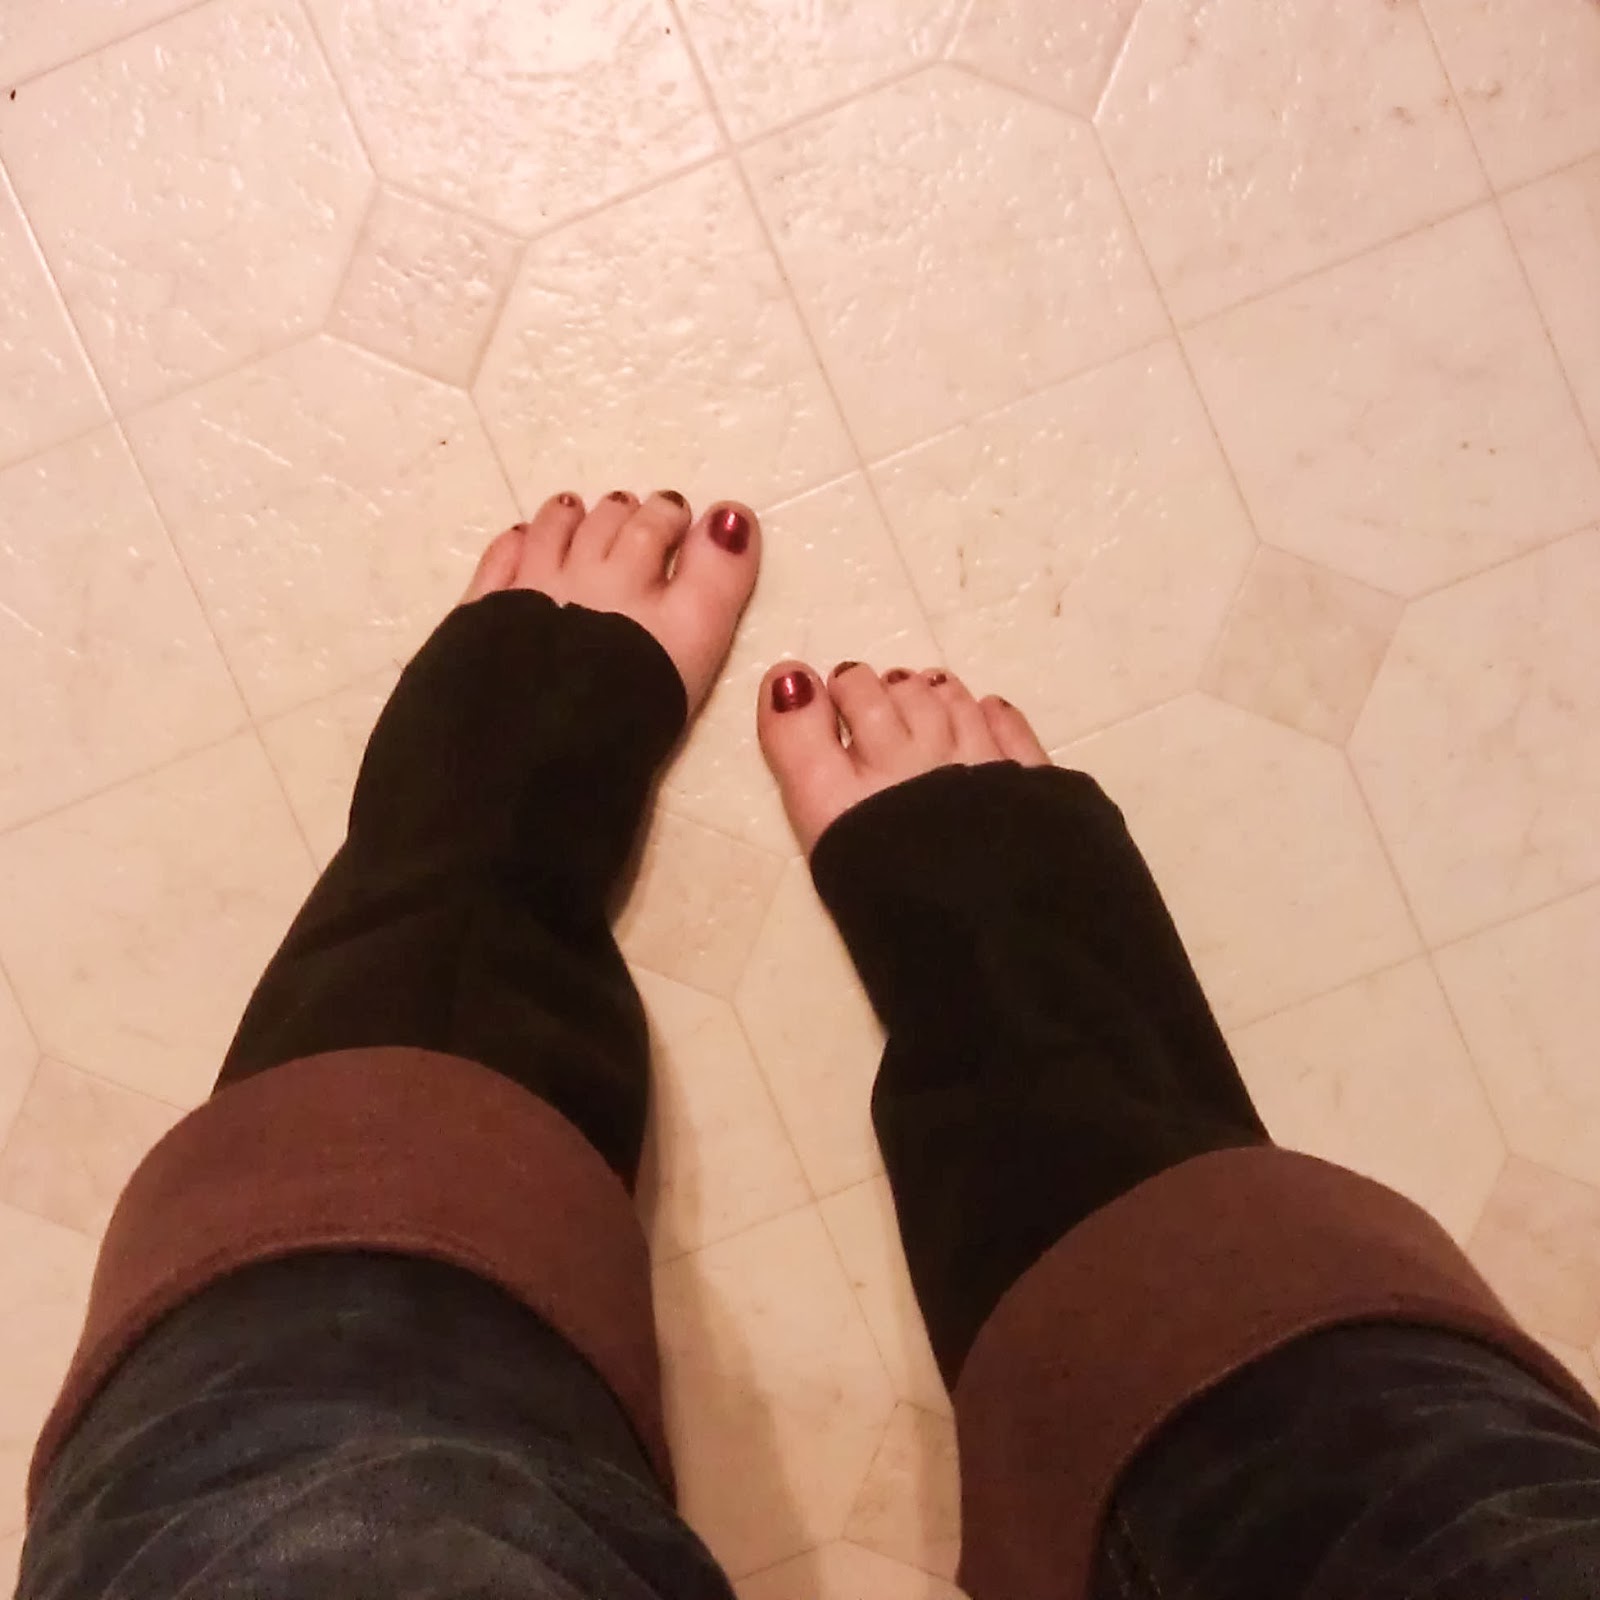
I made pirate boot shoe covers, and I was insanely entertained that they are like fingerless gloves for my long adult feet. 


BAHAHA. 


I painted my toenails just for these shots... is that weird?


(too bad)


LOOK AT THESE PARROT BOOTIES!!!


The hardest part was trying to figure out how to make them look like he had three toes. I thought it was important in making parrot feet. Otherwise he might have just been a kid with orange feet, and I couldn't have that. I like to make my costume parts as realistic as is possible (without stressing or going overboard).


Since the little one is just starting to stand, I decided he needed some "grip" on the bottom of his little booties. I didn't want him to slip on Halloween and get a boo-boo (nyuck nyuck nyuck -- I love puns).


I need to put a disclaimer out there that my mommy helped me make one of the booties. It was a great mommy/daughter bonding time and you know you're jealous -- Thanks, mom!


SO ONTO THE NEXT PROJECT WE GO!

After I made the children footwear, I was like, "OMG, HALLOWEEN PARTY IN 6 DAYS, OH NOOOOO!"

And then I realized that there was nothing wrong because I was doing it in the typical halloween fashion. There is no way that you can start a costume any earlier than that -- it's a logistical impossibility! So I pressed on! I had been wanting to be a can-can dancer for the last couple years, but I kept running out of time (big surprise). I decided to go big or go home this year and just do it. I started with a $5 floor-length skirt that was part of a bridesmaids dress I found at goodwill -- a teal taffeta with a cotton underskirt. I figured that I could throw on one of my corsets (it was buy one, get two 1/2 off when I had to buy undergarments for my wedding), and so began my project. I cut the under layer to just over the knee, and I tied the to layer of the skirt up "valance style", so it was shorter than the under layer. I gathered a bunch of colored ribbon and sewed it all over the underskirt to give it color. Add some patterned tights, a corset and tank top, and you're almost ready to go!

Which brings me to my next project.

spools? spools you say?

I need something to adorn my head. A tiny tophat fascinator, you suggested? Why, you read my mind! So I stayed up until nearly 4am making this adorable little hat!

It's made out of a feather, some ribbon, felt, and pure, unadulterated fun  magic costuming addiction.

And look how cute it is on!!!


As per usual, I completely forgot to take photos of myself at a party. These are the best of what I can recover, and I apologize in advance for the terrible pictures.

You can slightly see the ruffles made from ribbon on my thigh. I used pink, purple, and robin's egg blue. It turned out SO much better than I expected.

 This is as close as it's getting to "full body" -- The hulk on the right is my mother! My 4 year old nephew told her to be Hulk for Halloween. Could you refuse a request like that? I didn't think so.


While I was working on my own costume, I also helped beef up/change my other friend Kim's costume for Lydia in beetlejuice, so feel free to love up on her dress, too. :)

This is a good shot of the gang! And look at the tiny hat! 

And this is the last of the photos I have for this post -- there will be others, more, later! 

OH! Monday, I made a cape thing for a bat costume at work. There will be photos of it in the next several days. I had hoped to take all of the photos of all of the things, but I just ran out of time. Guess you'll just have to check back, huh? :)

UNTIL NEXT TIME! There are always projects cropping up on me, so STAY TUNED FOR ANOTHER EXCITING BLOG POST BY workthatcreativity.blogspot.com !

P.S. I opened an Etsy shop last week to unload some of my vintage jewelry and give you guys a chance to own some of my blogging history! Check it out! etsy.com/shop/workthatcreativity

Saturday, September 14, 2013

WALLA WALLA BING BANG (finally, it's done!)

I told the witchdoctor I wanted to make a patterned wall... or something like that. 

I HAVE FINALLY CURED MYSELF OF MY RIDICULOUS OBSESSION WITH LOVE PATTERNED WALLS (whoa, I am feeling silly and tired. I apologize for whatever may ensue)

And I must say, I think it turned out superduper stellar.

Here is the sneakiest of peeks! I don't want to give away the project that was pictured in front of my fantastic wall, so you'll just have to wait!

Anyway. As I mentioned before, I wanted a patterned wall. Wallpaper and paint are not options since I'm in an apartment. We're also not allowed to put any screws into the wall so we are limited to nails, ergo nothing too heavy for a nail. The silk wall I initially saw was GORGEOUS, but upon pricing silk I realized that my cheapness  financial responsibility   husband wouldn't allow me to spend $300 or more on a decorative wall.

THERE MUST BE A CHEAPER WAY!!!

Ah ha! Paper is the answer. Cheap, and if you get a decent cardstock, it's relatively durable, too.

And so began my humungous project. I purchased some colored cardstock paper for like $4/pkg, and instead of blank stencils (expensive), my mom found "leading blanks" for like $2. I made a perfectly symmetrical shape on my computer using a geometric pattern from the internet and created a template out of the leading blank.

 I traced and traced and traced and traced and traced and traced... and traced.... and traced... and traced... shapes. 

I traced shapes until I was seeing shapes. 

I never want to use scissors again.

And then I started cutting them out. I cut out shapes in my spare time for a good week before I had the 250-300 I needed to complete my wall.

Finally, the time had come. After laying out several possibilities for color/pattern combinations, I decided on one. I wanted something that would be acceptable to my husband but also nice for my photos and would go with our bedspread in our room. 

Oh man, this is the plainest, most boringest wall ever. Thanks, landlord.

So, how did I adhere these to the wall? I needed something removable, so I opted for the adhesive poster mounting putty. One package did my entire wall, so unintentionally got the right amount!


TAHHHHH DAHHHHHHH!

HOW DID I MAKE THE LINES STRAIGHT, YOU ASK??? 
I swiped my dad's laser level, and set it on vertical. I used a small template made from a piece of leading blank as a guide to know approximately how much space goes between each shape. If you look really closely as the pics of me hanging the shapes, you can see a vertical laser. I'd highly recommend a laser level to any handyperson.

My mom and I tag teamed the entire project, and it only took about 2 and a half hours to place most of the wall "tiles". It took me another 45 minutes or so unaided to complete the wall, including "framing out" the area where we keep our ironing board. 

I figured I didn't need to put them there since they'd be covered up anyway. A "frame" looks much more polished.

At the end of the entire project I had quite a few taupe colored sheets left, but I only had 3 of each blue tile. I decided to use them as artwork above the bed to tie in the whole thing.
IS IT ART?

You know you just might want to try it... GO FOR IT.


So in the end, I wound up with a craft space that is beautiful as well as useful -- It will make an awesome background from here on out, as you can see from the following photos. 

I HAD A SUPER BURST OF ENERGY THE DAY I PUT THE WALL UP SO I MADE SOME THINGS!

1. I made a pair of earrings! 
Sterling silver and dyed mother-of-pearl

2. I made a pendant!
Sterling silver and aventurine

My sister in-law mentioned "viking knitting" and I had never heard of it before. It looked super cool and relatively easy to try, so I used a chunk of sterling wire I had around to make a section. When all was said and done, my viking knit was way too short to make into a bracelet or a necklace, so I decided to weave it into a pendant. And I had an awesome aventurine bead, so I went for it.

3. I made another pendant!
but I forgot to take pictures! 
Photos coming in next blog

4. I made a necklace!
but it's not totally completed yet!
Photos coming when I figure out how to end it!

Anyway. Sorry I haven't been able to post in forever. You know how it is. Work, live, stuff, things, veg, etc. It happens to the best of us. I have several little projects lined up for the coming weeks, so I would expect to have another blog post out soon. So STAY TUNED!

Monday, June 3, 2013

Home Improvements. And other improvements.

The husband and I signed a lease for another year in our apartment, so that is one of the reasons why/how I was able to justify this whole "patterned wall" thing. But if I was going to go that far, I figured I want to create my own craft space, too!

Our apartment is only a one bedroom, but the bedroom is enormous for the amount we're in there. So in the last 4 years, we've been storing all of our miscellaneous in there. I realized after removing the stuff to go to our storage unit and the stuff to go to Goodwill that I forgot to take a "before" picture, so I've only got a "during" pic instead. You're just gonna have to power through it.
Pardon the laundry!

And here's a shot of the "after" -- I set up my card table and a bookshelf so now I have a place for all of my craft stuff to live! It had been stashed on top of/next to our kitchen table. I CAN'T WAIT TO MAKE MORE THINGS.

My table cloth is actually a shower curtain I bought at a garage sale for $2. It might also make an appearance as a backdrop sometime, I'm not sure. (Future project: recover the card table - the vinyl is covered in marker and stains... pretty sure I stole this from my brother and/or his friends at least 5 years ago).

Speaking of making more things, I did some!

I totally just realized I meant that to say "Do you like your bra straps sticking out all over the place". Obviously I was not paying attention. oh well.


SO GUESS WHAT I DID ABOUT IT?


I took these things: New strapless/convertible bra, old strapless/convertible bra, needle, thread, seam ripper, and two pins.


I removed the strap loops from the old bra and sewed them into the center front of my new bra so my bra straps don't show in my shoulder-less clothes!
Look how happy I look! [And how bare that wall is! -- See the need for the patterned wall?]

 It sounds really stupid, but I had been wanting to add another "loop" to my strapless/convertible for some time after seeing this:

I can't believe I never thought of this for halters/narrow shouldered tops. Duh. Oh, and males who read this: you're welcome.

There's nothing tackier than going to work with straps showing. Now, I feel completely comfortable and able to wear some of these shirts to work. 

And the other thing I did: 
I shortened the straps on the blue shirt pictured. I had been meaning to for months and finally got around to it today while I talked to my sister-in-law on the phone (shoutout to Angela, lol). I've got various other "fixer-upper" projects lined up, but I don't think I need to post them since they aren't particularly photogenic or interesting (you're welcome).


Overall, a lame blog post, but I had to start somewhere on my enormous project for the patterned wall. Would you be interested in seeing a fast-forwarded video of me applying my patterned wall cutouts? Just and idea I'm toying with. Until next time! 

Thursday, May 30, 2013

Methinks My Thinker Be Obsessed.

      I have a huge project in my head. Next time I have a chance, I am going to snap a photo of what inspired me to do what I'm going to be doing in the next several weeks. I'll try to remember to do some little blog posts while I'm collecting all I need for my major project, but I wanted to let you guys know that I might forget...

Anyway, a little tiny brief note about what got me going:

I absolutely fell IN LOVE with a patterned wall in one of the local shops in town, and the owner told me it was silk. I need a patterned wall.
... No, you don't understand.

I NEED IT.

So I googled and googled... and googled.

Crap, I cannot afford silk. Especially not enough to cover a wall. I honestly can't even afford fabric (not that I found any I was in love with). So I have decided that I am going to dedicate a lot of time as well as a huge blog post into covering a wall with a pattern. That will include several things:

1. Troubleshoot the no painting/please don't put holes everywhere in the walls problem.
2. Figure out a pattern/color
3. Create an actual space that is to be used as a background for photos (since every time I need to take some I come up short and use some pretty ridiculous methods for photo'ing)
     [Step 3 will include cleaning out/reorganizing all of the junk that we are currently storing in useable space, to become my craft studio!]

I am justifying all of this because we just signed a lease for another year and I definitely need a place to photo/store all of my craftiness.

So, it seems that this might be a massive undertaking, but I cannot get the image of that fabric wall out of my head.
It was like this, but wayyyy not.

 I can't even find anything similar. I'll just have to make do with loving whatever I make.

Anyway. I guess that's it for now, nothing too exciting, but I have just spent like... 2 hours planning this. Obsessed much? I think so. Now, I will retire for the night since I am going to go GARAGE SALING tomorrow!!! I hope I find some treasures :)

Sunday, May 26, 2013

Schmoozy Shoesies

The following might only be interesting to people who love shoes. If you have no interest in shoes and the shallow shoe love that is to follow, stop reading now!

I have several great pairs of shoes, so be prepared to be JEALOUS.

For my friend, Laura's wedding, I had these amazing shoes in my head. I wanted royal blue peep toe pumps and I searched the world over for them, to no avail. I did however stumble upon a super comfy pair of nude peep toe pumps, and needed a way to make them have some sort of color on them. So I came up with the idea to make a little decoration to make them pretty.

Here's what I came up with for Laura's wedding, amazing photo courtesy of Kimberly Neyer Photography . (If ever you need newborn photos, family photos, or engagement photos, please drop her a line! She did my and Laura's weddings last year -- unfortunately she is no longer doing weddings -- and was a blast to work with and the photos were AMAZING... I honestly cannot say enough good things about her and her work -- THANK YOU SO MUCH, KIM!!!).
These little flowers were initially hair clips, so I sewed them onto velcro to wrap on the shoes.

I had gotten so many compliments on these cute little shoe accessories that I decided to share them with everyone and make some more!

So here's what ya get!

These turned out to be a little on the costume-y side, but they're pretty darn cute anyway.

Today, I was just about to take a shoe photo shoot with only my nude peep toe shoes and I realized...
If I used other peep toe shoes, would my "shoesies" (as I've so fondly named my little decorations) fit other shoes? The answer was ASTOUNDING. At least to me. I did a victory lap around the apartment when I realized all my other shoes would work, too. Andrew gave me a disapproving look. Whatever.

HOW FITTING FOR MEMORIAL DAY! I'll admit it, I love geeking out over holidays where I can accesorize, so I made patriotic shoesies!!!
Oh say, can you see? These shoes rock.

I did not realize until well after the fact that red and purple together symbolize the red hat ladies, so it is also fitting that I put buttons on them, too. Since I'm an old woman at heart anyway.

Then I got to try my shoes on and take some foot selfies (wayyy harder than you would expect). I also had to find something to make a pretty background out of since I don't have a yard or anywhere pretty enough for this girly blog. Look at my average feet in adorable shoes!

I'll admit it. Even though I probably will never use the red, white, and blue shoesies, these do look super cute for this weekend. I love them.

And the most painful/cutest shoes award goes to these. SO cute, but SO much discomfort. My ankle veins definitely are making their feelings known.

SO MANY OPTIONS!!!! 

You better watch yourself, people, because your simple shoes will be jealous of my shoesies. You're also welcome to make your own. Or, you can pay me to make some for you by emailing me a request.

Tuesday, May 14, 2013

Out of my funk. But still funky.

**disclaimer: I seriously typed "I'm back" into google image search and this was the first pic. I thought it was fitting.


I know you've all been eagerly awaiting my next post and it took FOREVER. I mentioned earlier that I was making the most boring scarf in the world. Well... It didn't end up being the most boring scarf in the world -- it's now a super freaking adorable earwarmer!

... I honestly did not have the patience to make it long enough for a scarf... or even a cowl. Man, I am lazy.

The way it all came about is that I was going about my cute little crochet business while watching movies and apparently I have very little ability to multitask effectively. I made about 30 rows and realized that somehow I had dropped 5-7 stitches, so the end was shorter than when I began. I was really really really disappointed because I finally had gotten into my groove and all my stitches were beginning to look really super awesome and even, and in the end it would not look good. So I shoved the partially completed scarf under our ottoman out of sight while I was disgusted with it.

I decided that it was definitely time to start cleaning the apartment, and you all know how cleaning goes -- you're always looking for a distraction! So I found again the yarn project and realized that I had just bought the most awesome box of buttons recently (Thanks, Gail!!!), and HAD to show them to you guys and the mother of pearl buckles might be an awesome addition to the scarf thing. 

So here are  my preciouses the buttons: 

OMG AREN'T THEY BEAUTIFUL!!! 
They will all become something wonderful :) And these are just the MoP ones!
 I realized today that I'm developing an obsession with real mother of pearl buttons so if you have any, I would definitely take them off of your hands to look at forever.

Anyway. I made this thing and I think I might actually wear it someday!

Wow, I'm so fancy and artsy and stuff I was going for "sullen teenager" in this shot. Also, I think it reads very clearly "took this myself and wish I had a photographer".

But really, I do like it. I might actually even use it. Absolutely not now, since it's 90 degrees outside, but I guess I had to finish it sometime. I am THE MASTER of procrastinating. 

Monday, April 8, 2013

Sneak peek...

http://instagram.com/p/X2lgXnlonI/
Hope this turns into a legitimately wearable garment. No failure hurts as bad as spending tons of time on something that you wouldn't even deem fit as pajamas.

Monday, April 1, 2013

Easter Craft Time! (Plus video bonus)


 I mentioned in my previous blog that my friends and I get together around Easter to do what we have named the "Easter Beer Hunt". Each year, we end up learning a little bit about how to play it and adjust the rules to make the game fair/give tips on how to have a successful Easter Beer Hunt. Last year, I thought up the idea to decorate my 6 pack case to show off my Easter "basket". It was wonderful. So this year -- I had to make it better, I had to make it stronger, I had to make it take more time to make! I also [due to poor planning] had to do it without a hot glue gun.


Rule # 1: the "basket" must be a six pack. I suggest choosing a drink that is not a type of beer that everyone else will bring. The majors (Miller, Bud, Coors, etc) may get mixed up with others. You can always decorate your specific beers, too (we thought of that as a "thing" this year).

Rule # 2: There may be some sort of theme. We will release a note about the "theme" of our Easter Beer Hunt a couple weeks before the event. This year, I chose to go with the traditional "basket" theme.

I found a bunch of pretty colored ribbons. That'll do for an "action" shot.

Rule # 3: Votes are accumulated via Facebook. The winner is awarded a ribbon. 

Here's a good shot of the front. I chose to leave the sides open for an unknown reason. I also put a glitter bunny on the front!
And the backside was a little too plain with just the woven fabric ribbon, so I gave it a pop of color :)
close-up of the actual weaving. It was a ton of work. I don't recommend it.

AND NOW FOR THE HUNTING RULES:

1. Someone else must hide your beers in the approved areas.
2. Flashlights are welcome and encouraged since we hide them at night. Subject to your discretion.
3. Try to remember where you hide the other person's beers.
4. First one to find all six of their own beers gets bragging rights!
5. HAVE SOME SILLY FUN!
6. Maybe tell the police that many adults will be wandering the street with flashlights and beer... Forgot to do that one this year...

So I ended up in 4th place for the basket decorating contest. I am confident that if people actually had to score the votes on effort that mine may have won. It looked super great in person. Want to see the other entries? OF COURSE YOU DO!

Winner[/cheater] -- 18 pack Beer Bunny from John & Heather


Second Place - Flamboyant Easter - Mike


Third Place - Pretty Princess on a Pedestal - Kim


Honorable mention - Lucky Cutesie - Jenna (check out the rabbit's foot! awesome!)
Dishonorable mention - NOT REALLY DECORATED - Kevin


And here's the whole shebang together :)


In addition to our evening of silly beer hunting, the husband and I went to our good friends' house and decided to do a Harlem Shake video with all the children. We are all Halloween costume people, so here's what you get when we decide to unite our costume powers!