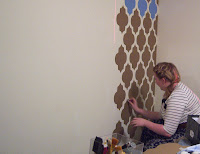
I told the witchdoctor I wanted to make a patterned wall... or something like that.
I HAVE FINALLY CURED MYSELF OF MY RIDICULOUS OBSESSION WITH LOVE PATTERNED WALLS (whoa, I am feeling silly and tired. I apologize for whatever may ensue)
And I must say, I think it turned out superduper stellar.
Here is the sneakiest of peeks! I don't want to give away the project that was pictured in front of my fantastic wall, so you'll just have to wait!
Anyway. As I mentioned before, I wanted a patterned wall. Wallpaper and paint are not options since I'm in an apartment. We're also not allowed to put any screws into the wall so we are limited to nails, ergo nothing too heavy for a nail. The silk wall I initially saw was GORGEOUS, but upon pricing silk I realized that my cheapness financial responsibility husband wouldn't allow me to spend $300 or more on a decorative wall.
THERE MUST BE A CHEAPER WAY!!!
Ah ha! Paper is the answer. Cheap, and if you get a decent cardstock, it's relatively durable, too.
And so began my humungous project. I purchased some colored cardstock paper for like $4/pkg, and instead of blank stencils (expensive), my mom found "leading blanks" for like $2. I made a perfectly symmetrical shape on my computer using a geometric pattern from the internet and created a template out of the leading blank.
I traced and traced and traced and traced and traced and traced... and traced.... and traced... and traced... shapes.
I traced shapes until I was seeing shapes.
I never want to use scissors again.
And then I started cutting them out. I cut out shapes in my spare time for a good week before I had the 250-300 I needed to complete my wall.
Finally, the time had come. After laying out several possibilities for color/pattern combinations, I decided on one. I wanted something that would be acceptable to my husband but also nice for my photos and would go with our bedspread in our room.
Oh man, this is the plainest, most boringest wall ever. Thanks, landlord.
So, how did I adhere these to the wall? I needed something removable, so I opted for the adhesive poster mounting putty. One package did my entire wall, so unintentionally got the right amount!
TAHHHHH DAHHHHHHH!
HOW DID I MAKE THE LINES STRAIGHT, YOU ASK???
I swiped my dad's laser level, and set it on vertical. I used a small template made from a piece of leading blank as a guide to know approximately how much space goes between each shape. If you look really closely as the pics of me hanging the shapes, you can see a vertical laser. I'd highly recommend a laser level to any handyperson.
My mom and I tag teamed the entire project, and it only took about 2 and a half hours to place most of the wall "tiles". It took me another 45 minutes or so unaided to complete the wall, including "framing out" the area where we keep our ironing board.
I figured I didn't need to put them there since they'd be covered up anyway. A "frame" looks much more polished.
At the end of the entire project I had quite a few taupe colored sheets left, but I only had 3 of each blue tile. I decided to use them as artwork above the bed to tie in the whole thing.
IS IT ART?
You know you just might want to try it... GO FOR IT.
So in the end, I wound up with a craft space that is beautiful as well as useful -- It will make an awesome background from here on out, as you can see from the following photos.
I HAD A SUPER BURST OF ENERGY THE DAY I PUT THE WALL UP SO I MADE SOME THINGS!
1. I made a pair of earrings!
Sterling silver and dyed mother-of-pearl
2. I made a pendant!
Sterling silver and aventurine
My sister in-law mentioned "viking knitting" and I had never heard of it before. It looked super cool and relatively easy to try, so I used a chunk of sterling wire I had around to make a section. When all was said and done, my viking knit was way too short to make into a bracelet or a necklace, so I decided to weave it into a pendant. And I had an awesome aventurine bead, so I went for it.
3. I made another pendant!
but I forgot to take pictures!
Photos coming in next blog
4. I made a necklace!
but it's not totally completed yet!
Photos coming when I figure out how to end it!
Anyway. Sorry I haven't been able to post in forever. You know how it is. Work, live, stuff, things, veg, etc. It happens to the best of us. I have several little projects lined up for the coming weeks, so I would expect to have another blog post out soon. So STAY TUNED!


